Easy No-Bake Granola Bars
This granola bar recipe is so easy and delicious! These wholesome granola bars are naturally sweetened, gluten free, and the perfect healthy snack. Recipe yields 16 bars.
Ingredients
- 1 ¾ cups old-fashioned oats or quick-cooking oats
- 1 teaspoon ground cinnamon
- ½ teaspoon fine sea salt (if using regular table salt, scale back a bit)
- 2 cups mix-ins* (nuts, seeds, chocolate, shredded coconut or dried fruit)
- 1 cup creamy peanut butter or almond butter
- ½ cup honey or maple syrup
- 1 teaspoon vanilla extract
Instructions
- Line a 9-inch square baker with two strips of criss-crossed parchment paper, cut to fit neatly against the base and up the sides. The parchment paper will make it easy for you to slice the bars later.
- Place the oats in a large mixing bowl**. Add the cinnamon and salt, and stir to combine. Set aside.
- Now we’ll blitz the mix-ins briefly in the food processor or blender (or, you can chop them by hand). Add any large nuts (like almonds or pecans) first and blitz for a few seconds. Then add the rest and run the machine for a few more seconds, until the ingredients are all broken up into pieces smaller than your pinky nail. Pour the mix-ins into the bowl of oats.
-
In a 2-cup liquid measuring cup, measure out the nut butter. Top with ½ cup honey and the vanilla extract. Stir until well blended. If you must, you can gently warm the liquid mixture on the stovetop or in the microwave, but make sure it’s close to room temperature before you pour it into the dry mixture (this is especially important if using chocolate, since it will melt).
-
Pour the liquid ingredients into the dry ingredients. Use a big spoon to mix them together until the two are evenly combined and no dry oats remain. This takes some arm muscles, but you can do it! If the mixture was easy to mix together, that’s a sign that you need to add some more oats—sprinkle in more oats until you can’t incorporate any more.
-
Transfer the mixture to the prepared square baker. Use your spoon to arrange the mixture fairly evenly in the baker, then use the bottom of a flat, round surface (like a short, sturdy drinking glass) to pack the mixture down as firmly and evenly as possible.
-
Cover the baker and refrigerate for at least one hour, or preferably overnight. (The oats need time to soak up some of the moisture so they aren’t sticky.) When you’re ready to slice, lift the bars out of the baker by grabbing both pieces of parchment paper on opposite corners. Use a sharp knife to slice the bars into 4 even columns and 4 even rows.
-
Wrap individual bars in plastic wrap or parchment paper (if you store them all together, they will stick to one another). Bars keep well for several days at room temperature, a couple of weeks in the fridge, or several months in a freezer-safe bag in the freezer for best flavor.
Notes
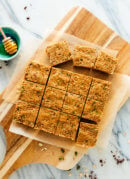
*Mix-in options: Any combination of nuts (almonds, pecans, walnuts, etc.), seeds (pepitas or sunflower seeds), chocolate chips or roughly chopped chocolate, shredded coconut and/or dried cranberries or cherries. For the bars shown here, I used 1 cup pecan halves, ½ cup pepitas, ¼ cup shredded coconut and ¼ cup roughly chopped dark chocolate. Keep in mind that anything larger than your pinky nail will need to be broken into smaller pieces. If you don’t have a food processor, chop them by hand.
**Granola bar texture: If you’re using old-fashioned oats and would prefer a more smooth, less chewy texture (shown in my photos), blitz your oats in a food processor for 3 to 5 seconds to break them up. Then, add them to the bowl.
Change it up: These bars can be sweetened (mostly) with Medjool dates, if you’d like to increase the fiber content. Soak 12 dates in piping hot water for 10 minutes, then tear them in half and remove their pits. Place them in a food processor with 2 tablespoons maple syrup or honey and blend until completely smooth.
Make it gluten free: Be sure to use certified gluten-free oats.
Make it nut free: Do not use nuts (pepitas and sunflower seeds are good options) and replace the nut butter with sunflower butter.
Make it vegan: Use maple syrup instead of honey.
Nutrition
The information shown is an estimate provided by an online nutrition calculator. It should not be considered a substitute for a professional nutritionist’s advice. See our full nutrition disclosure here.
Find it online: https://cookieandkate.com/best-granola-bars-recipe/
