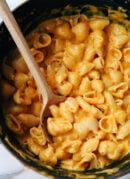
Butternut Squash Mac and Cheese
This butternut squash mac and cheese is a delight! It’s just right—cheesy and creamy but not too rich, with subtle roasted butternut squash flavor. To help this recipe come together quickly for a weeknight dinner, roast the squash in advance. If you choose a large squash, you’ll have about twice as much as you need—freeze it for future use. Recipe yields 8 servings (quite a lot!) and leftovers are great.
Ingredients
- 1 medium to large butternut squash (1.5 pounds or larger), halved
- 1 teaspoon extra virgin olive oil
- 2 tablespoons unsalted butter
- 1 teaspoon garlic powder
- 1 teaspoon onion powder
- 1 pound short-cut pasta (pipe regate, macaroni noodles, casarecce, cavatelli, fusilli)
- 5 cups water
- 1 teaspoon fine salt, to taste
- 4 ounces cream cheese, cubed
- 8 ounces shredded sharp cheddar cheese
- ½ cup (2 ounces) finely grated Parmesan cheese, plus more for serving
Instructions
- To roast the squash: Preheat the oven to 425 degrees Fahrenheit. Line a large, rimmed baking sheet with parchment paper for easy clean-up. Scoop out the squash seeds with a spoon (we won’t need them for this recipe). Rub the olive oil over the cut sides of butternut, then place them on the prepared pan, flat sides down.
- Bake until the squash flesh is easily pierced through with a fork, about 40 to 60 minutes. Once it’s cool enough to handle, peel off the skin and discard it. Use a potato masher to mash up the squash—don’t worry about getting it perfectly smooth. You’ll need about 2 cups mashed squash for this recipe (you’ll likely have plenty extra, which you can freeze for future mac and cheese). Set aside, refrigerate and/or freeze the squash until ready to use.
- To prepare the mac and cheese: Melt the butter in a large pot or Dutch oven over medium heat. Add the garlic and onion powder and cook for 2 to 4 minutes, stirring often, until the butter is fragrant and you see little brown flecks forming in the pan. Add the dry pasta and gently toss to coat it in butter.
- Pour in the water and salt. Add 2 cups of the mashed butternut squash. Cover the pot and bring it to a boil over high heat. Once boiling, remove the lid and set the timer for 8 minutes.
- Cook, stirring occasionally, until the timer goes off. Do not drain the water. Stir in the cream cheese. Cook until the cream cheese has melted and the pasta is al dente (careful when you taste, it’s quite hot), about 4 to 5 more minutes. Turn down the heat as necessary to avoid scorching but maintain a steady simmer.
- Reduce the heat to low. Add the cheddar and Parmesan, and stir until the mixture is melted and creamy. Remove the pot from the heat.
- Season with salt, to taste (I usually add ¼ teaspoon more). Serve the pasta in bowls with extra Parmesan grated on top, if desired. Leftovers keep well, covered and refrigerated, for up to 5 days.
Notes
Make it gluten free: Gluten-free pastas vary widely. Choose a spiral-shaped gluten-free brown rice pasta, such as fusilli, over other pasta types (my tester was pleased with Jovial brand). Stir gently and don’t cook the pasta any longer than necessary or it may start to lose its shape.
Nutrition
The information shown is an estimate provided by an online nutrition calculator. It should not be considered a substitute for a professional nutritionist’s advice. See our full nutrition disclosure here.
Find it online: https://cookieandkate.com/butternut-squash-mac-and-cheese/