Are you interested in starting your own blog? Awesome! You’re in the right place. In this guide, I’ll walk you through setting up a new blog from start to finish. I know you can do it, because I’ve built this blog from the ground up. I started this blog in 2010 and it’s been my full-time job since 2014.
When I started this blog, I was working in online marketing. My job was to teach small businesses how to build and market their websites, so this is my field of expertise.
Why start a blog?
Blogs can be the perfect medium for sharing your thoughts online. If you create great content and promote your blog, you can build an online community around your shared interests. Some people earn a side salary or even generate a full-time income from their blogs (have I mentioned that I love my job?).
Or, you can keep it small—I created my first blog when I moved to France for a few months, so I could share my photos and stories with my family at home.
Perhaps you want to share:
- Stories and photos
- Knowledge and opinions
- Art
- Hobbies
- Recipes (here’s my guide to starting a food blog)
- Travel experiences
- Tutorials or DIY projects
- Fashion or lifestyle
- Favorite products
If you sell a product or service, blogs can be great marketing tools. You can start a blog for professional purposes, such as sharing:
- Your resumé and portfolio
- News and updates
- Behind-the-scenes details about your business
- Content related to your products or services
Your blog can be about whatever you want it to be. That’s the beauty of blogging! Whether your blog concept fits into one of the categories listed above or you have an entirely different idea, this guide will help you get started.
Free vs. paid blogging options
Should you start with a free blog, or pay for premium options? If you want to share your travels with family or school projects with fellow students, a free service might be fine. The most popular free blogging platforms are WordPress.com, Blogger and Tumblr.
Pros and cons of free blogging platforms:
- Pro: They’re free.
- Pro: They’re pretty easy to set up.
- Con: Your blog’s web address will be long and hard to remember (http://myblogname.wordpress.com), unless you pay for a domain name or premium option.
- Con: If you want features that aren’t offered by your blogging platform, you’re out of luck.
- Con: You’re limited to the blog designs (themes) offered by the platform, unless you’re good at coding.
- Con: The platform might place ads on your site, whether you want them or not, and they’ll keep the ad revenue to themselves.
- Con: The platform could disappear entirely or delete your content with little-to-no warning.
Paid platforms offer a lot more. If you want to make money from your blog, I definitely recommend investing in a paid platform. If you’re interested in creating a popular destination that attracts steady traffic from search engines, one that looks professional for your business, and/or one that scales with you as your blog grows, a paid platform is your best bet.
Pros and cons of paid blogging platforms:
- Pro: They’re inexpensive. Plans cost as little as $2.95 per month.
- Pro: They’re surprisingly easy to set up, if you follow a great step-by-step guide. You’re in the right place!
- Pro: Your blog will have a domain name of your choosing (http://myblogname.com).
- Pro: Your blog can grow with you. If your traffic grows like crazy, you can upgrade to a better hosting plan. If you need fancy features, you can find a plugin or pay a developer to make them for you.
- Pro: You’ll have a ton of blog designs (themes) to choose from. You’ll find great free themes, or you can pay for a premium theme, or hire a designer to make you a custom theme.
- Pro: You decide if you want ads on your site or not. If you decide to place ads on your site, the money’s all yours.
- Pro: You’re in charge of your website and your content.
- Con: You have to pay for the platform, but like I said in the first bullet point, it’s inexpensive.
The bottom line
If you want to make a totally awesome blog that people want to visit, I recommend paying for a premium blogging platform. By that, I mean that you should set up a self-hosted WordPress blog. Say what?!
Self-hosted means that you’re in charge of hosting your own blog (that’s the part that you pay for), instead of letting one of the free providers host it for you. Self-hosted WordPress blog means that you’re hosting your own blog and running WordPress software on it. The terms are a little confusing here, because WordPress software isn’t the same as the free WordPress.com blogging platform.
WordPress software is the industry standard for blogging, and it’s free to use. I use it to run this blog, along with 60 million others, according to WordPress. WordPress software is constantly updated for improved features and security. It’s the best!
Simple steps to start your own blog
Here are the basic steps to build a self-hosted WordPress blog today. We’ll complete steps one through four in as little as 30 minutes, then we’ll get to the fun customization stuff! By the time we’re done, your blog will have its own custom domain name and its own distinct look.
1) Name your blog and buy a matching domain name.
Domain names are short, memorable and typically end in .com (yourblogname.com).
Cost: free with Bluehost or around $15 per year elsewhere.
2) Find a good web host.
A web host stores your website and makes it accessible on the internet. Your website “lives” on your web host’s servers.
Cost: $2.95 per month and up.
3) Install WordPress.
As I’ve explained, WordPress is top-of-the-line, industry standard blogging software.
Cost: Free!
4) Install a WordPress theme.
Your WordPress theme will determine the look, feel and functionality of your blog.
Cost: Free to $129.
5) Install WordPress plugins.
WordPress plugins extend the functionality of WordPress in certain areas. For example, one of my recommended WordPress plugins displays related posts at the bottom of each post.
Cost: Generally free!
6) Install Google tools.
Google offers helpful tools and services like Google Analytics, which will tell you how many people are visiting your blog.
Cost: Free!
7) Start blogging!
Now you can start publishing awesome content on your new blog.
Cost: Hard work!
Step 1: Name your blog and buy a matching domain name.
I’m hoping you already have the perfect name for your blog picked out! It took me a while to land on mine.
Not sure what to call your new blog?
Try listing some words that describe your future content or your interests, your lifestyle, your background, etc. Then look at those words and list out some adjectives for each one. Do any of those words go well together?
You can also try writing a short mission statement and see if the name comes to you. It might help to throw names around with a friend, and think through the names of your favorite blogs. There are still lots of great blog names that haven’t been dreamed up yet, I promise. Try to come up with a few names that you like, since they might not all be available.
An ideal blog name is:
- Memorable
- Descriptive
- Short
- Easy to spell
- Unique and available as a domain name that ends in .com (don’t use hyphens to make it work!)
Once you have some ideas that you like, you’ll need to make sure no one else has already claimed them.
You can buy your domain name from a number of providers, but it’s easiest to buy it through your web host. Hop over to Bluehost to enter your desired domain name. Hit “search” and it’ll tell you if your domain name is available. If so, snatch it up quick!
Once you have picked your perfect domain name, you can get it for free with your BlueHost hosting plan. Or you can just buy your domain name through Bluehost and figure out your hosting situation later. Do not delay on your domain name or it could be gone before you know it.
Step 2: Find a good web host.
You’ll want to start with an affordable shared hosting plan that offers one-click WordPress installation (that’s a mouthful). Once you pick a host and install WordPress, you won’t have to mess with hosting again for a long time.
The best web host for new blogs:
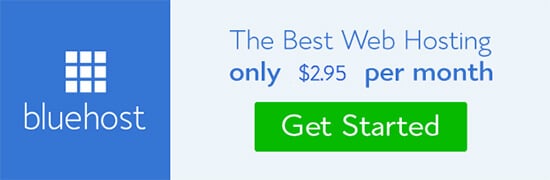
BlueHost is affordable, reliable, easy to set up, and they offer 24/7 customer support. Bluehost’s “starter” plan is about as inexpensive as hosting gets, and it has everything you need to get started. Click here to get started with BlueHost for as low as $2.95 per month and get a free domain name.
With Bluehost, like all the other inexpensive hosts, you’ll pay for your plan upfront. Don’t worry, though. If you aren’t happy with Bluehost, want to go to a different host later, or just want to throw in the towel on blogging, Bluehost will refund the months that you don’t end up using their service. (Excluding the domain name fee, which you’d pay for elsewhere anyway.)
Good news: Bluehost loves Cookie and Kate readers. Purchase your hosting through any of my links to Bluehost and you’ll get the best deal available. No promo code required.
Here’s how to get the most from your Bluehost plan:
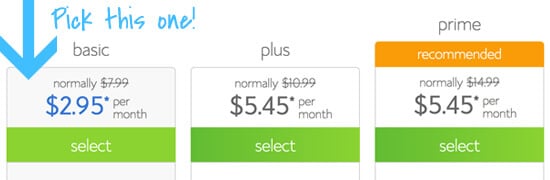
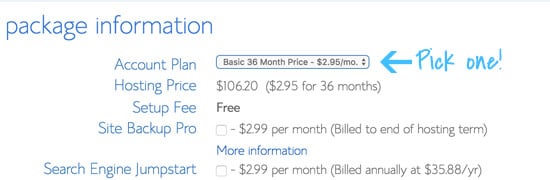
First, choose your plan. I recommend the starter plan.
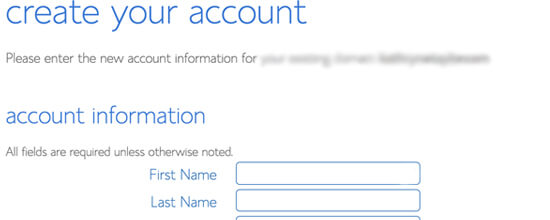
Then you’ll fill out some basic information to create an account.
Then, choose your term. In order to get your free domain name for a year (a $15 savings) and a significant discount on your monthly rate, you’ll need to pay for at least one year of hosting upfront. Feel free to choose a longer term if you’re serious about blogging and want to save more money, but one year is a great start.
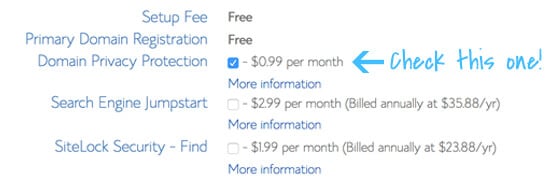
Lastly, choose your add-ons. The only add-on I recommend right now is “Domain Privacy Protection,” which will keep your personal address private. Otherwise, your address will be available to marketers and the public at large (be safe).
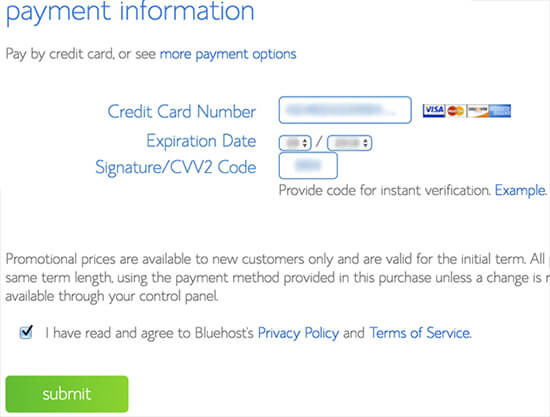
Then enter your payment information. You’ve done this before. :) Check the box that you agree to their terms of service and hit the big green submit button.
High five! Click the “create your password” button.
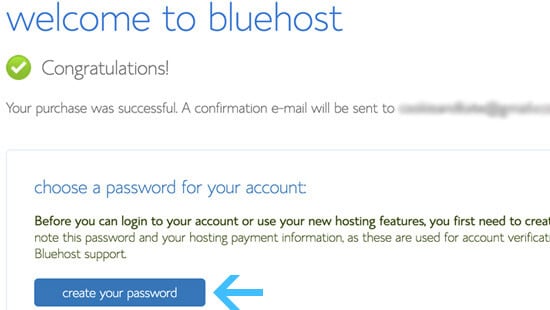
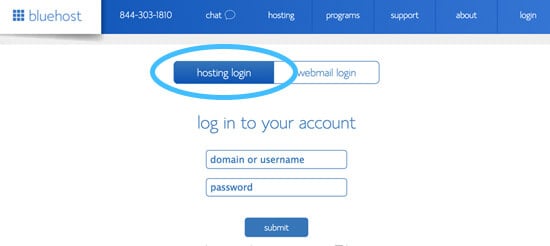
Enter a password of your own choosing. Write it down somewhere safe so you won’t forget it. Once you hit submit, you’ll see this screen. Click the “login” button.

By default, “hosting login” (circled in blue) should be selected. That’s what we want. Enter your user name and password and click submit.
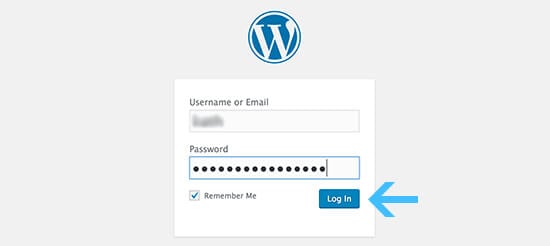
Step 3: Install WordPress.
Easy! Since you purchased a shared hosting account, Bluehost will install WordPress automatically. (For any other hosting plan, you can find the option to install WordPress with one click in your customer control panel.)
Welcome to your new blog! Before you go wild, let’s fix one little thing (you’ll thank me later).
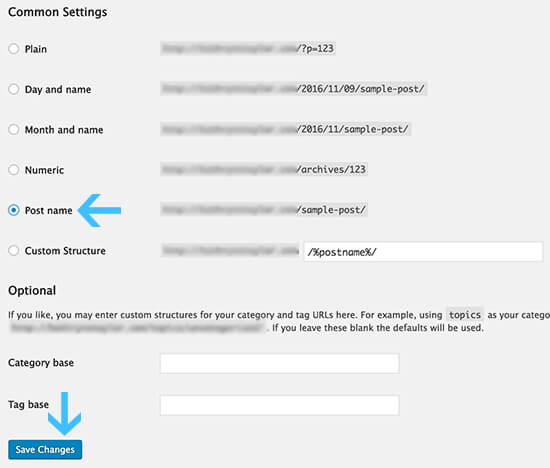
Look in the sidebar for “Settings.” Hover over “Settings” and click on “Permalink Settings.”
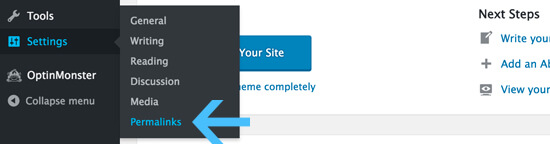
Change your permalink structure to “Post name.” Then click “Save Changes.”
Now go ahead, click around and explore your new blog. If you click on the name of your new blog in the top left corner (next to the little home icon), you can see how your blog looks so far.
Step 4: Install a WordPress theme.
Now we’re getting to the fun part. Your new blog is already using the default WordPress theme. Your theme determines the look and feel of your site, so you can choose a different one if you’re not happy with the default.
You can start with a different free theme, if you’d like. I bought my premium WordPress theme from a reputable provider (details below), and I’ve never regretted it.
What to look for in a WordPress theme
- User friendly: Find one that offers built-in design options so it’s easy to change basic stuff like your logo, color scheme, etc.
- Backed by great support: When you experience technical issues, a responsive support team and/or community forums can be so helpful.
- Well designed: Your theme should suit your style and offer the features you want. The theme should also be coded by someone who knows what they’re doing.
- Responsive. Responsive designs automatically resize themselves so they’re easy to browse on computers, phones and tablets. That means your visitors won’t have to pinch and zoom to read your posts.
- Optimized for search results: This goes along with the last couple of points, because a well-designed site will naturally rank higher in search results than a site that is full of coding errors. (Want to know if your potential theme has coding errors? Run the demo theme URL through the W3C’s markup validation service. You don’t have to understand what all the errors mean. Fewer errors are better than more errors.)
Recommended premium WordPress themes
I originally built this blog on a basic, free WordPress theme and customized it myself. In February 2014, I launched a redesigned website that is responsive and my site has grown significantly since then, thanks in part to the theme.
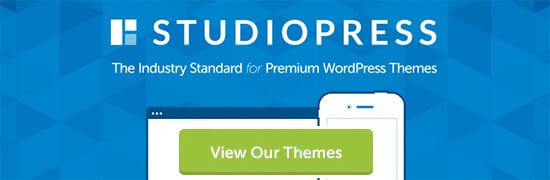
My blog uses the Genesis framework via Studiopress. Studiopress offers the most functional and attractive themes available, if you ask me. That’s why I use their themes. All of their themes are responsive, which is critical, and their community forums are helpful, too. Get Studiopress themes through Genesis Pro for a yearly fee, or get them included with a WP Engine or Flywheel hosting plan (this website is hosted by Flywheel).
How to install a WordPress theme
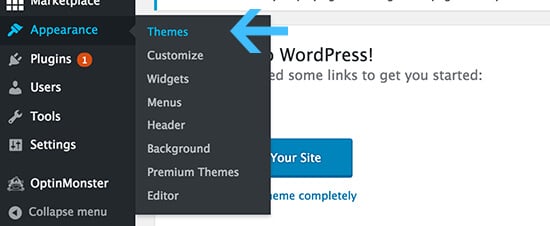
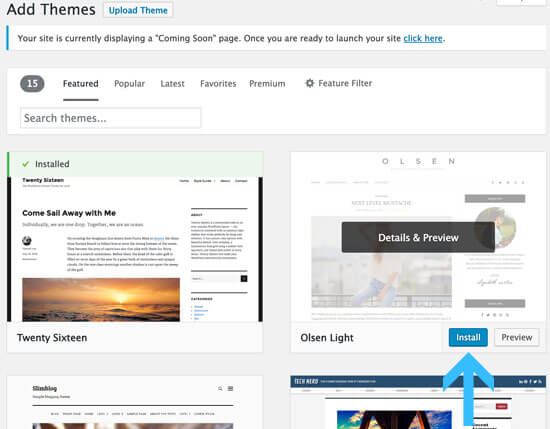
Look in the sidebar for “Appearance.” Hover over “Appearance” and click on “Themes.”
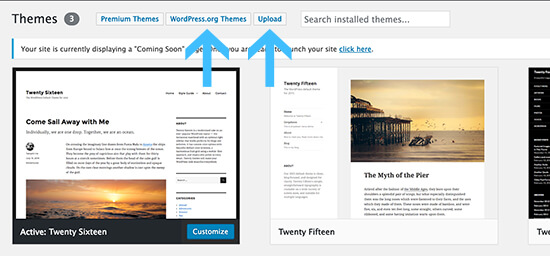
Here, you can see a few theme options that WordPress has already installed on your blog. They’re free to use.
You can browse more free themes by clicking on “WordPress.Org Themes.”
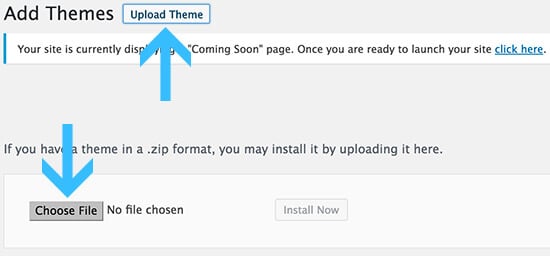
Or, if you have downloaded a theme elsewhere, you can click the “Upload” option.
If you’re browsing free WordPress themes and see one you’d like to install, hover over it and click “Install.”
If you’re uploading a theme instead, click “Upload Theme.” Then you’ll see an option to “Choose File.” Click that, and find the file on your computer. Then click “Install Now.”
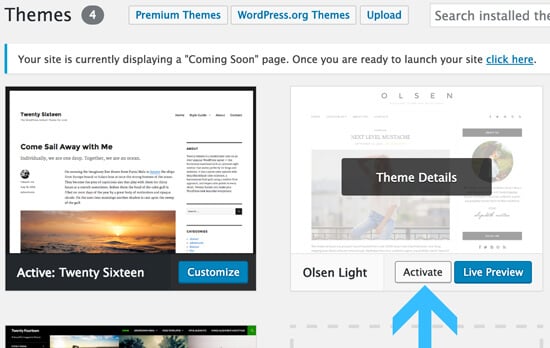
Finally, go back to your “Themes” setting and click “Activate” for the new theme.
Step 5: Install WordPress plugins.
Each of these plugins provide valuable features that might not automatically come with your theme. You can deal with most of these later. I recommend installing Yoast SEO (listed last) right away, however, because it will make the next step easier.
Recommended WordPress plugins:
- Akismet: Filters out spam comments without requiring CAPTCHA. Nobody likes CAPTCHAs.
- Social bookmarking plugin: Since my sharing buttons are custom-built, I don’t keep up with the latest options. Just be sure to use a plugin like it so your posts are easy to share. Genesis Simple Share is a good-looking social plugin that works with Studiopress themes.
- Yoast SEO: SEO is complicated and this plug-in will help you make sure you have covered your bases. You’ll need to take the time to go through all the steps and set it up properly. Be sure to use it to set up Google Analytics and Google Webmaster Tools. It will be worth the effort!
How to install a WordPress plugin
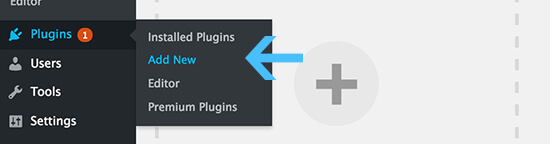
Look in the sidebar for “Plugins.” Hover over “Plugins” and click on the “Add New” option.
Now you have a couple of options. You can use the “Search Plugins” field and search for one of the plugins by name. When you find it, click “Install Now.”
Or, you can upload a plugin that you downloaded elsewhere by clicking “Upload Plugin.”
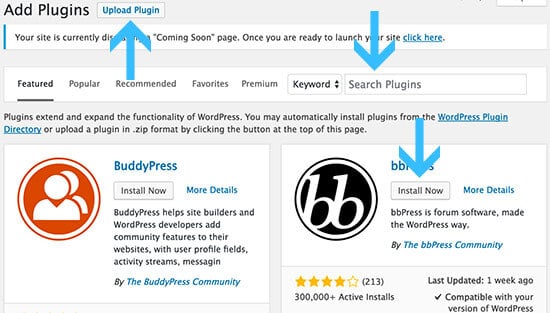
Finally, click “Activate,” which will appear in the same place as “Install Now.” Then, you might have to configure some settings (consult the plugin’s instructions if you’re not sure).
Step 6: Set up Google tools.
You can use an existing Google/Gmail account, or create a new account for your blog, if you’d rather. I prefer to keep my personal and blog email accounts separate, so I created a new account for my blog. You can create a new Gmail account here (it’s free).
Once you have a Google account, log in and set up the following:
- Google Analytics: Helps you track blog traffic. (Note: install the tracking code in your Yoast SEO plugin settings.)
- Google Search Console: Makes sure your website is up and running. (Note: install the tracking code in your Yoast SEO plugin settings.)
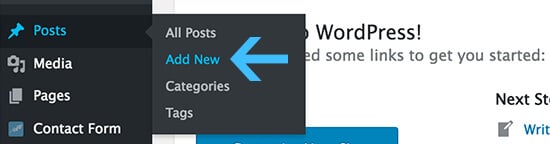
Step 7: Start blogging!
Now you’re ready to start publishing posts.
To create a new post, look in the sidebar for “Posts.” Hover over “Posts” and click on the “Add New” option.
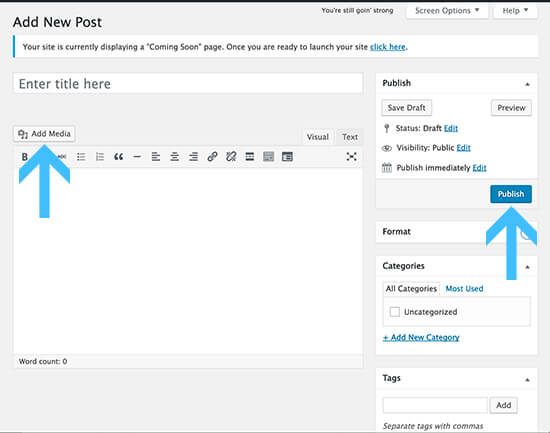
Here’s where you can start typing. The formatting options here remind me of Microsoft Word, so hopefully they look familiar to you, too.
If you want to upload a photo, click “Add Media.” When you’re ready to publish the post, click “Publish.”
Further resources
How to use WordPress
- Essential WordPress Training on Lynda (take advantage of their free trial period!)
How to create awesome content
- Ira Glass on Storytelling
- Blog Q&A: Should I launch with content?
- Creative inspiration vs. imitation
How to get visitors to your blog
- 10 Ways to Market Your New Blog by The Everygirl
- 33 Ways to Market Your Blog by Amy Andrews
- 21 Quick Actions You Can Do Today to Set Your Blog Up for Massive Success by Fizzle
- How to Develop a Social Media Strategy for Your Business
How to get traffic from Google and other search engines
How to make money from your blog, and other business resources
- How to Build a Blog Business Plan by Melyssa Griffin
- How to Make Money Blogging by Amy Andrews
- The Comparison Trap: How to Enjoy (and Not Envy) the Success of Others
- Just Starting by Emily Henderson
- 7 Things You Need to Stop Doing to Be More Productive
- Disclosure Guidelines for Bloggers from the FTC
My favorite ongoing resources
- Blogging Tips from A Beautiful Mess
- Food Blogger Pro Podcast
- Marie Forleo
- The Tim Ferriss Show
- Wired Magazine
More resources for bloggers on Cookie and Kate
- My Top 20 Tips for Food Blogging (relevant to all blogs!)
- Food Photography Tips
- How to Start a Food Blog (geared specifically toward food blogs)
Questions? Please leave them in the comments section below and I’ll do my best to answer them.

Sheri
Thank you! Great resources here✨
Eleni
Wow! This is so helpful. As a musician, I am constantly told that you have to market yourself to be competitive…but computer skills aren’t really my forte (if you’ll pardon the pun). This guide will be useful as I move toward setting up a professional looking website.
Kate
So glad you found this helpful, Eleni! I hope your new website setup goes smoothly.
Brian Cavanaugh
H Kate,
I think this is a super great post. It is super detailed and informative. I am very interested in how you manage the email list etc.
Thanks!
Brian
Geisel Molina
Hi Kate,
Wow this is hands down the best guide on how to start a blog. I’m currently studying to get my certificate in aromatherapy and I just know I want to share my new knowledge with the world, but didn’t know how to go about doing it…….until now.
I happened on this guide after looking up a recipe for breakfast quinoa (the vegetable bowl), so I got a new recipe and great blog info with resources all in one.
Thanks a bunch for both.
Geisel.
Kate
You’re welcome, Geisel! Good luck with your certification, and I hope you have a great time with your blog. :)
joelle butcher
Hi there, thanks for all the detailed info. I’m just starting a blog and have followed many of your steps. I’m curious what you use for security? There are so many options and I’m not sure if I’m doubling up or leaving vulnerable gaps. Thanks again for sharing.
JoElle
Kate
Hi JoElle, I use Cloudflare’s $20/month option (they also have a free option) that helps prevent a lot of security issues. It’s also a good idea to change the URL for your login page (check out the WPS Hide Login plugin) and make sure to use long, unique passwords for your various accounts.
Ana Olteanu
Thanks so much for this post, Kate :) I’m starting off a green lifestyle blog and this was a perfect guide to get it going.
Expect for me to link some of your amazing recipes in the new year!
Kate
Good luck! I’m happy it was helpful. Feel free to link to my recipes, but I just ask you follow my linking policy :) You can find it here: https://cookieandkate.com/cookie-and-kates-photo-and-recipe-policy/
A.S.
Excellent, excellent info, thanks!!!!
Kate
Thank you!
eric666
A blog is now a commonplace sight when we see computer users now, but how they can start a blog and what factors they have to keep in mind to develop a quality blog is really very insightful. I’ve gone and checked numerous blog-sites including Epson Support and then stumbled upon your article. Really helpful for me…
Kate
Great!
Stephen Hobbs
Hi – I wish I had your knack for detail! This post describes every step perfectly. This is very impressive and commendable.
Stephen
BTW, the guacamole is a hit. Wife and kids want it all the time. Thanks for coming up with that!
Kate
Thank you!
Harish Kumar
Blogging is the best business to make money, most of them are not aware of this and some of the unsuccessful bloggers are shouting that earning will be very low, its a waste time, they don’t have the patience to make money but I am going suggest this article for friends to start a blog. keep sharing with us.
Kate
Thanks for sharing!
Catherine
Thanks for the sharing this article and nice tips that you mention in this post.. awesome post for the becoming a blogger.. please keep it up with a new post..
William
It’s a journey and is called step by step online journey. Your blog description incredibly provides most important things what newcomer at first need for their start. It’s a great help for blogger. Thanks for a lovely piece.
Kate
Thanks, William!
Ann
I like reading a post that can make men and
women think. Also, many thanks for permitting me
to comment!
Kate
Thanks, Ann!
domain.opendns.com
This article gives clear idxea in support off the new users of
blogging, that trly how to do running a blog.
Kate
Thank you!
kayla
Hello, the “package extras” section looks different from your screen shots. I’m not seeing anywhere the option for domain privacy protection. Any tips? Thanks
Kate
Hi Kayla, that is strange. Here’s some information on how to turn it on from Bluehost. Hope that helps!
Robyn
Question..which plugin do you recommend to create a “Shop” page for affiliate marketing?
Kate
This is actually a custom page. I’m researching alternatives!
Ali
Very informative, thanks so much for taking the time!
Can I start the blog and keep it private until I’m ready to publish it? Can I publish it to only certain people to start?
Ali
Kate
Hi Ali, yes you can keep your content private until you are ready to publish it. You can share a private URL to a specified group of people.
Maria Caraballo
hi! do you recommend choosing some of the other options such as CodeGuard Basic or SiteLock Security? Or just the privacy one? Thanks!
Mary
Hello Kate!
Huge fan here :)
Thank you so much for sharing such useful information!
I’m a student and I can’t afford to buy a premium theme. I want to create a food photography website. Could you please let me know what free theme did you use before this one? Is Kadence any good?
love ♥
Mary